Pages

Monday, May 11, 2015

Final Project Week 4: Presentation/Reflection


Project Goal

For our final project, my partner and I chose to tackle the issue of toilets being too loud when they flushed, which can scare some children, removing their desire to flush after themselves. 

When we heard about this issue, we wanted to design a device that would not only ensure that children would have time to leave the stall before the toilet flushed, but also one that would still empower children to have a physical role in the process, as they would in situations where this device was not present. 


We decided that this could be achieved through the use of a button, ultrasonic sensor, and automated flushing device. These three components would work together in the following process:
  1. An individual would press the button.
  2. The button press would trigger the ultrasonic sensor to start reading values
  3. The automated flushing device would activate based on the sensor readings:
    • If a child is still in the stall, the flush will be delayed 
    • If there is no child in the stall, the toilet flushes automatically. 
In this way the toilet would be flushed only when the child is ready, and has had time to leave the stall. 


Design Process


For this project, our design process included the following steps which can be read about in greater detail in my previous posts:


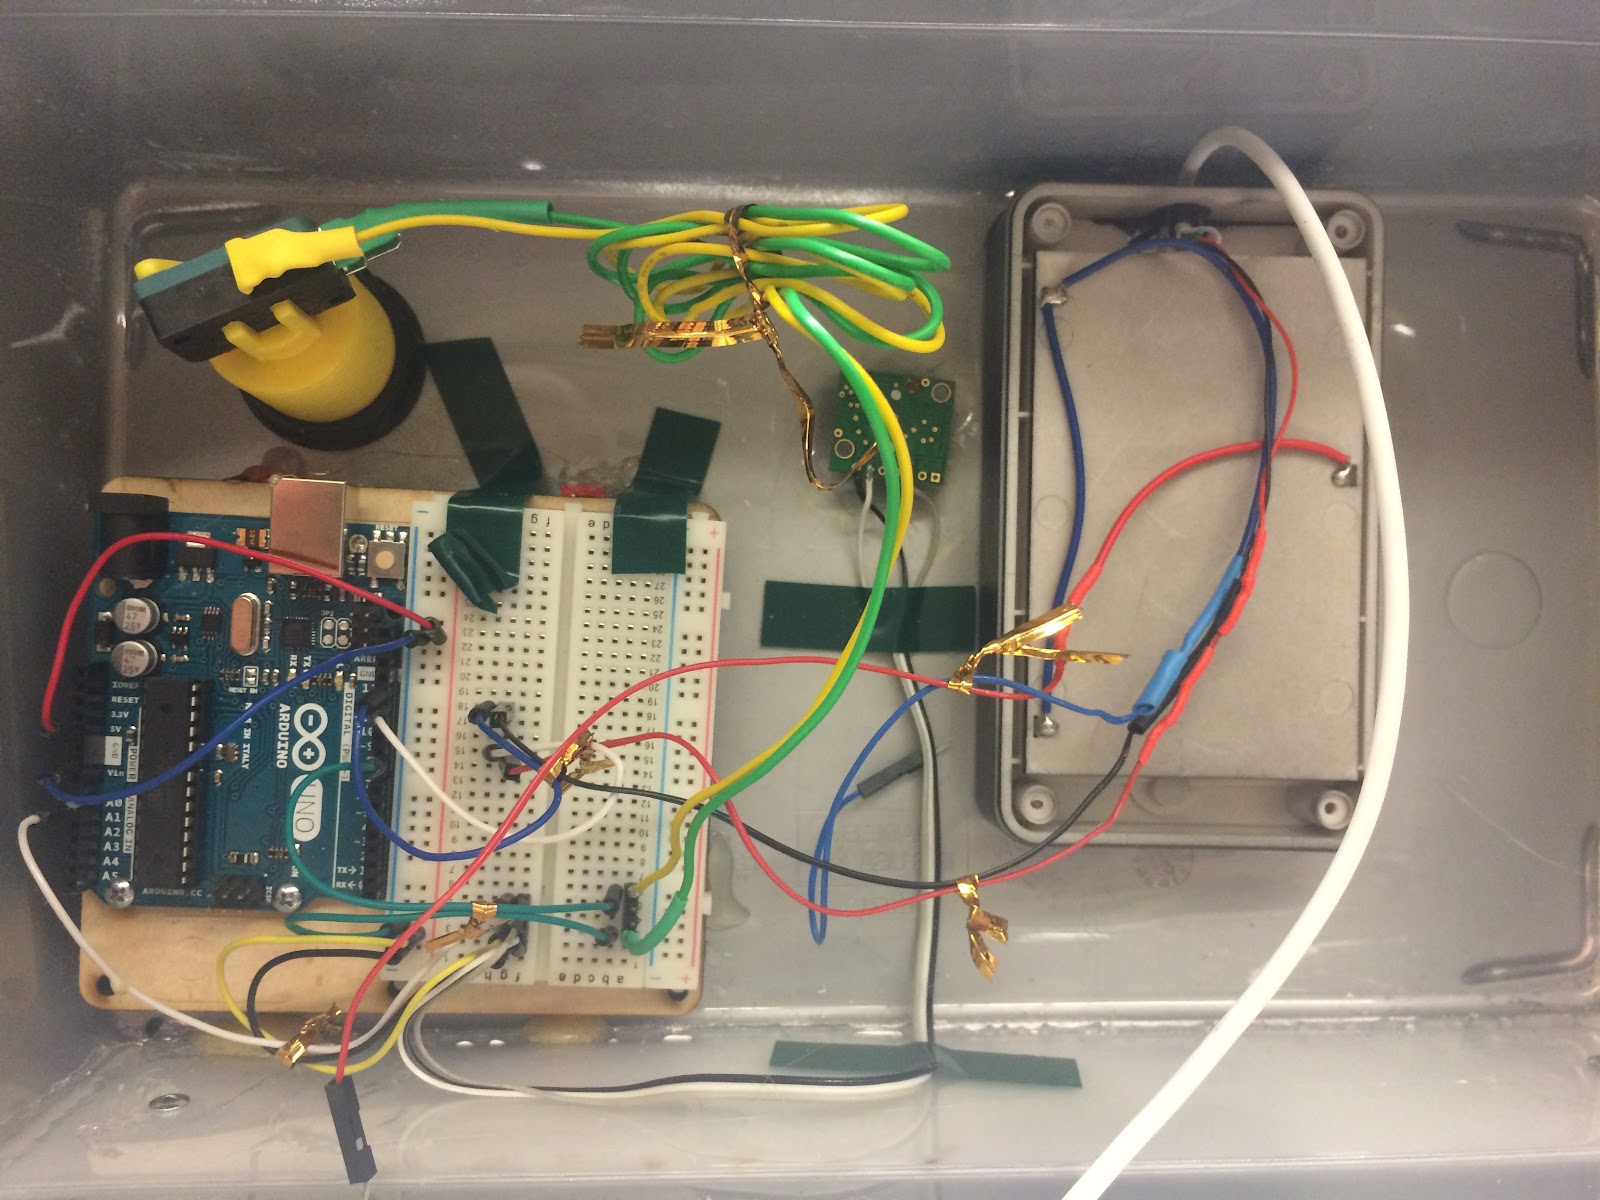
1) Connecting all the device components (battery pack, button, ultrasonic sensor, and flushing device) together so they could communicate:


2) CreatingMaking sure the components functioned together correctly with the final code:


Final Code


3) Setting up a place to house all the device's components: 


4) Setting up the flushing device motor within the toilet tank:


5) Attaching the device to the top of the toilet tank


The Final Product!


Below is a video of the motor of our final device in action. It's a bit hard to see the device work when it's all set up, so we removed the toilet tank's lid for demonstration purposes. All in all we were glad to see that our device worked how we wanted it to. 


In the video above, the motor component of the device lifts up the valve shown below when activated, allowing water to enter the toilet bowl, and the flush process to begin.


Here's my partner Helena (left) and I with our final product:


Final Reflection

Working on this project has been a challenging, but rewarding experience. Even though we had challenges along the way with things like coding, and having soldered wires break apart, eventually we were able to develop a device that achieved our original goal; building a button/sensor automated toilet flusher. 

With more time, however, there are a couple things we would like to improve on. For one, it would have been nice to have enough time to design and build our own flushing motor to put inside the tank, rather than to have to buy one. It would also have been good to try the device on an actual toilet with water in it to make sure that the set up of the device was alright and the timing of the motor was sufficient to allow enough water to enter the toilet bowl.

We could also experiment with different box designs to make a more secure, water tight, and small place to house our device's components.

All in all though, I am happy with how our project turned out. Having everything housed inside one box/the toilet tank means that the device is relatively easy to set up and be easily switched to other toilets. There is also little chance of individual components of the device getting individually damaged. With a little of the improvements mentioned before, this device could be ready to sell!


Thanks for tuning in to the progress of my final ENGR160 project! This may be the end of this blog but look out next spring for a whole new set of blogs!

Friday, May 8, 2015

Final Project Week 3: Building

Now that we had our code worked out, and all our materials had finally arrived, it was time to put our device together. Below is a description of how each component, as well as the final product was put together. 


Soldering/Heat Shrinking

In order to connect both the motor and touch sensor to our Arduino we first needed to attach pins to the end of their wires through soldering. In the case of our button, it was important to solder the wires onto the "normally open" connecting section on the button, as that is how the touch switch we used to test our code was set up. The "normally open" setting means that no current will flow when the button is unpressed, and current will flow through when the button is pressed. One the wires were connected, the exposed portions needed to be covered by heat shrining a section of wire covering over them. 


Arduino

One of the challenging parts of this project was to set up the Arduino and breadboard while we were coding, and determine whether is was our code or setup contributing to the device's dysfunctionality. Below is our Arduino's final setup including the wiring of the ultrasonic sensor, button, motor, and battery pack. 


The Box

In order to prevent the wiring of our device from coming into contact with water, and also to make the device more aesthetically pleasing, we decided to house all the components of the device inside one box that would rest on top of the toilet. 

The box we decided to use was a clear, plastic box we found in our classroom. While it was big enough to house all our components, it needed a couple alterations. The first was that it did not rest flat on the surface of the toilet tank. This was remedied by riveting a  a 1/2 cm thick piece of delrin to one of the box's sides to act as the new base. We wanted the box to rest on it's sides so that the lid could be facing the wall and be easily removed to allow access to the box's contents.

The box also didn't have a way to securely stay on top of the toilet tank, which we solved by adding four suction cups to the bottom of the box; next to, rather than on top of the delrin sheet to prevent the box from tipping back and forth. The base of the box including the delrin sheet and suction cups is shown below:


We  additionally wanted to make sure that kids would not be tempted to play with what was inside the box, so we decided to spray paint it silver (originally it was clear). 


The box also need to be able to accommodate the button, ultrasonic sensor, and motor wire which needed access to the outside environment to function. We decided to achieve this by making two different circular cuts on the outside front portion of the box (opposite the lid), and then a small rectangular cut at the base of the lid. The rectangular cut was made using a bandsaw, and sandpaper was used to smooth the edges. For the two circular cuts, we first measured the diameters of the button and sensor, then used a compass the trace out matching circular stencils. These stencils were place on the appropriate places on the box, and a drill press with a small drill bit was used to trace the circumference of each circle. Once this was done we used a box cutter to finish up the cutting process and sandpaper to smooth out the holes. The image below shows the sensor and button fit through the two circular holes on the front.


Once these holes were complete, we could then secure the rest of our components inside the box using hot glue, gorilla glue, and electrical tape. When setting up the inside of the box, we took care to make sure that the battery pack could easily be removed when needed. The box was set up as below:


Motor Set-Up

Once the box was ready to be put on top of the toilet , we could then set up the motor inside of the tank. We set the motor up using the video shown below:

Our Set-up:


All that's left now is to present/demo our device to the rest of the class!